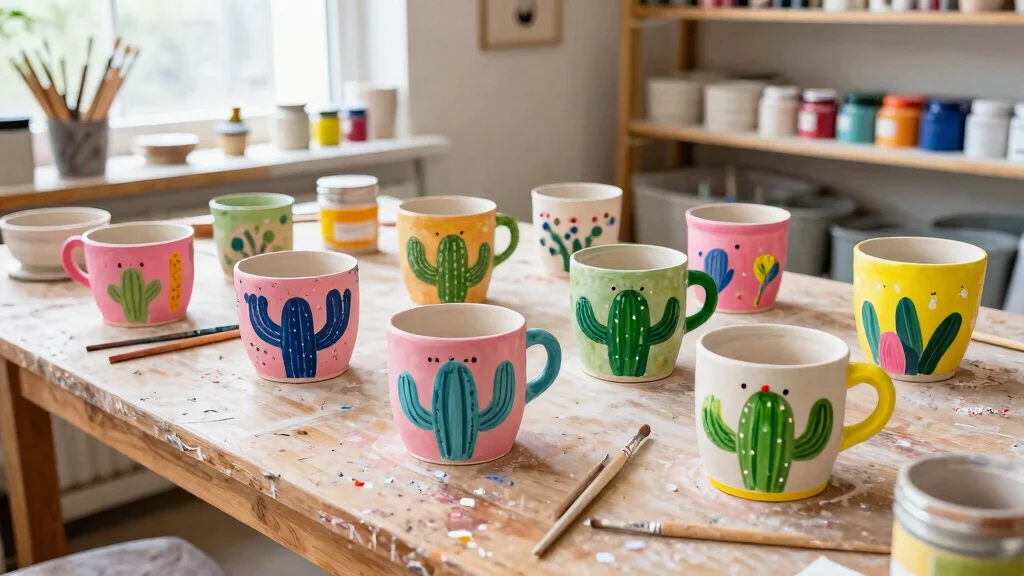
Cactus pottery painting has me completely captivated lately. There’s just something so fun and quirky about these spiky plants that brings a playful touch to any space. With their vibrant colors and unique shapes, cactus-themed pottery adds a warm, inviting vibe, especially in kids’ rooms. If you’re on the lookout for creative ways to liven up your home decor, this post is just for you.
Whether you’re an experienced artist or a parent exploring fun activities with your kids, you’ll find delight in these 15 cactus pottery painting ideas. I’ve gathered a mix of designs that are cheerful, eye-catching, and guaranteed to spark creativity. Each idea is not only perfect for sprucing up your home but also makes for memorable bonding moments while crafting together. Get ready to dive into a world of whimsy with projects that are colorful, fun, and easy to tackle!
Key Takeaways
– Discover 15 unique cactus pottery painting ideas that infuse playful style into your home decor.
– Explore a variety of pottery painting techniques that cater to all skill levels, making it perfect for family crafting sessions.
– Each idea encourages creativity, allowing you to create colorful pottery designs that reflect your personality and style.
– Learn how to personalize your cactus pottery pieces with messages and designs that resonate with both kids and adults alike.
– These whimsical cactus creations not only serve as delightful home accessories but also make fantastic gifts for friends and family.
1. Bright and Cheerful Pastel Cactus Pots

Start with a palette of soft pastels to create enchanting cactus pottery that radiates warmth and joy. Using colors like mint green, soft pink, and buttery yellow can blend beautifully, offering a refreshing look.
These colors are perfect for a kids’ room, making it feel uplifting and happy. Use sponges to dab the colors on, allowing for a charming watercolor effect. Add cute faces or little flowers around the cacti for extra whimsy!
– Mix colors for unique shades
– Use stencils for precise designs
– Let kids experiment with their own patterns
Step-by-step:
1. Gather your pastel paints and brushes.
2. Lightly sketch your cactus shapes onto the pot.
3. Use a sponge to apply a base color.
4. Layer additional colors and let dry.
5. Add fun details with a fine brush.
6. Finish with a clear gloss for shine.
This bright and cheerful design brings a little sunshine to any corner.
Bright and Cheerful Pastel Cactus Pots
Editor’s Choice


2. Bold and Bright Cactus Patterns

For those who crave adventure, bold and bright cactus patterns can make a stunning statement. Using vibrant colors like electric blue, sunny orange, and vivid purple will make your pots pop like never before!
Paint each cactus with stripes or polka dots to create a playful vibe. These bold designs can really liven up a kid’s room and spark creativity.
– Use painter’s tape for crisp lines
– Layer colors for depth
– Encourage kids to showcase their personality in designs
Step-by-step:
1. Choose your vibrant paint colors.
2. Prepare pots by cleaning them thoroughly.
3. Use painter’s tape to outline designs.
4. Paint in bold colors and let dry.
5. Remove tape and add extra flair with brushes.
6. Seal with a gloss for extra shine.
This style is energetic and funky, perfect for a fun-loving space!
Bold and Bright Cactus Patterns
Editor’s Choice


3. Whimsical Cactus Creatures

Transform your cactus pots into adorable characters with whimsical cactus creatures! Drawing inspiration from cartoonish styles, you can create cacti with eyes, smiles, and even little arms!
Colors can range from light greens to fun rainbow patterns, adding a playful touch. Children will love to create their own cactus friends to decorate their rooms!
– Use a fine brush for detailing
– Encourage kids to name their cactus creatures
– Add glitter for a magical sparkle
Step-by-step:
1. Sketch your character designs on paper first.
2. Choose your base paint color for pots.
3. Paint the base color and let dry.
4. Use a fine brush for detailing faces and features.
5. Let everything dry completely.
6. Finish with a coat of acrylic sealant.
Cactus creatures bring a sense of fun and imagination into the home!
4. Geometric Cactus Art

For a modern twist, geometric cactus art offers a sleek and stylish approach. Use sharp angles and block colors to form abstract cactus shapes. This clean design can fit seamlessly into more contemporary decor.
Incorporating metallic paints can add a touch of glam, making the pots stand out in any room!
– Use rulers for exact lines
– Combine metallics with matte finishes
– Offer templates for kids to follow
Step-by-step:
1. Gather geometric design ideas.
2. Choose metallic and matte paints.
3. Sketch geometric shapes onto pots.
4. Paint sections carefully, allowing drying in between.
5. Enhance with clear gloss for the final touch.
This modern approach is great for older kids who might enjoy a more sophisticated design.
❝Geometric cactus art gives cactus pottery painting a sleek, playful edge. Use sharp angles, block colors, and metallic paints for glam, then balance with matte finishes. Pro tips: provide kid-friendly templates and rulers for exact lines to spark creativity.❞
Geometric Cactus Art
Editor’s Choice


How To Choose The Right Cactus Pottery Painting Supplies
When diving into the world of cactus pottery painting, choosing the right supplies can elevate your DIY experience. With so many options available, it may feel overwhelming. Here’s a simple guide to help you select the best materials for your colorful pottery designs.
1. Paint Type:
Choose between acrylic and ceramic paints. Acrylic paints are versatile and easy to work with, making them ideal for beginners. Ceramic paints, on the other hand, are specially formulated for pottery and provide a durable finish. If you want your cactus pots to survive outdoor elements, ceramic paint is a great choice.
2. Pottery Material:
Select the right type of pottery for painting. Terra cotta pots are popular due to their porous surface, which absorbs paint well. Stoneware is another option, offering a smooth finish that can showcase vibrant colors. Consider the texture you prefer for your cactus home decor.
3. Brushes and Tools:
Invest in a variety of brushes to achieve different effects. Flat brushes work well for broad strokes, while fine brushes help with intricate designs. You may also want to grab sponges for texture effects or dotting tools for playful patterns. Having the right tools makes all the difference in your DIY cactus art.
4. Sealants:
Don’t forget to protect your finished work! A clear sealant helps preserve your colorful pottery designs from fading or chipping. Look for weatherproof sealants if your pots will be used outdoors. Applying a sealant after the paint dries makes your cactus pottery durable and long-lasting.
5. Color Palette:
Choose a color palette that reflects your style. Bright and cheerful pastels can create a light-hearted feel, while bold colors can make a strong statement. Test your colors on a small area of the pot before committing to a full design. This way, you can ensure that the final look is exactly what you envisioned.
6. Budget:
Determine how much you’re willing to spend. Pottery painting can be budget-friendly if you focus on a few essential supplies. Consider starting with a basic set of paints and brushes before expanding your collection. Sometimes, less is more, especially when you are just starting your cactus pottery journey.
Pro Tip:
Before you begin painting, sketch your design on paper. This helps you visualize how your cactus pottery will look and allows for adjustments before committing to paint. You can also try practicing on a spare piece of pottery to perfect your technique. Happy painting!
5. Nature-Inspired Cactus Scenery

Bring the beauty of nature inside with detailed cactus scenery pots. Paint landscapes that include desert scenes with mountains, sunsets, and vibrant wildflowers surrounding your cactus.
This design captures the essence of the great outdoors, perfect for kids who love to explore nature. The colors can be earthy and natural, allowing for a serene touch to any room.
– Use larger pots for more detailed scenes
– Incorporate different shades of green and brown
– Encourage storytelling through their painted pots
Step-by-step:
1. Plan a desert scene sketch on paper.
2. Choose earthy color palettes for paints.
3. Begin painting the background first and let dry.
4. Paint cacti and surrounding elements.
5. Add finer details last and seal with a gloss.
These scenery pots can ignite imagination and a love for nature!
Nature-Inspired Cactus Scenery
Editor’s Choice


6. Fun Textured Cactus Pots

Texture adds depth and interest to cactus pottery. Explore techniques like sponging, stippling, or even adding fabric or paper for 3D elements! Kids can use their hands to create fun designs that add a playful touch.
Using different materials can enhance the sensory experience and provide unique finishes.
– Experiment with different materials like twine or fabric
– Use multiple layers for dynamic looks
– Encourage children to touch and feel their creations
Step-by-step:
1. Get different painting materials, including texture tools.
2. Choose a base color for the pot.
3. Apply texture paste or fabric to the pot’s surface while wet.
4. Paint over once dry to highlight textures.
5. Seal with a protective finish.
Textured cactus pots can make unique decor items that are both fun to create and visually engaging!
7. Minimalist Cactus Design

Minimalist cactus pottery embraces simplicity with clean lines and understated elegance. Using a limited color palette, you can create designs that are chic and sophisticated. These pots can easily blend into any decor style.
Perfect for parents who appreciate a more subtle touch to their child’s room!
– Stick to black, white, and one accent color
– Focus on line work and simple shapes
– Use negative space to your advantage
Step-by-step:
1. Choose a monochrome color scheme.
2. Lightly sketch minimalistic cactus shapes on the pot.
3. Paint using consistent strokes to maintain simplicity.
4. Allow to dry and then add another layer if needed.
5. Finish with a sealant for a polished look.
Minimalism in cactus design offers a refreshing breath of sophistication.
8. Layered Color Blending

Layering colors in cactus pottery painting creates beautiful depth and vibrancy. Encourage kids to dab and blend colors using sponges or their fingers for a more organic, free-form look. This method yields stunning results that are both fun and easy!
The variability in color blending adds personality to each piece.
– Start with lighter colors first
– Experiment with blending techniques
– Use contrasting colors for dramatic effects
Step-by-step:
1. Choose a color palette that inspires creativity.
2. Apply a base color and let dry.
3. Begin layering with a sponge, blending colors gradually.
4. Keep adding color until desired depth is reached.
5. Finish with a glossy sealant for added shine.
This technique is playful and makes for stunning, one-of-a-kind pots!
9. Personalized Cactus Messages

Turn cactus pottery into a canvas for love and laughter by adding personalized messages! Kids can write their favorite quotes or funny phrases alongside their cactus designs, creating a piece that’s uniquely theirs.
Choose colorful lettering to match the cactus colors for a fun and cohesive look.
– Use stencils or freehand for lettering
– Choose vibrant colors to stand out
– Encourage children to express themselves creatively
Step-by-step:
1. Plan your designs and messages first.
2. Paint the base cactus design and let it dry.
3. Use a contrasting paint color to add lettering.
4. Allow everything to dry completely.
5. Seal the final pot with a protective gloss.
Personalized cactus messages create a meaningful touch that adds warmth to any space.
10. Cactus with Nature Prints

Incorporate real elements of nature into your cactus pottery painting by using leaves, flowers, or twigs to create prints! Kids can dip these elements in paint and press them onto their pots, resulting in unique textures and patterns.
This technique allows for creative exploration and a tactile experience!
– Experiment with different plants for variety
– Use washable paints for easy cleanup
– Encourage creativity and spontaneity
Step-by-step:
1. Gather natural elements from the garden or park.
2. Prepare the pots with a base coat and let dry.
3. Dip leaves/flowers in paint and press onto pots.
4. Add cactus designs around prints once dry.
5. Seal with a protective finish.
Nature prints create a beautiful interplay between art and the environment.
11. Funky Mixed Media Cactus

Create a mixed media cactus pot using a blend of painting and collage! Kids can add elements like fabric, beads, or paper to enhance their cactus designs. This approach encourages creativity by allowing them to explore different textures and materials.
Combining different mediums can lead to stunning and unique results!
– Use a strong adhesive for added elements
– Layer items for depth
– Experiment with different materials for variety
Step-by-step:
1. Prepare pots with a base color and let dry.
2. Cut and arrange fabric or paper pieces on pots.
3. Adhere elements with glue, ensuring they’re secure.
4. Paint around or over the collaged elements for integration.
5. Seal everything with a protective coat.
Mixed media cactus pots bring endless possibilities for creativity!
12. Seasonal Cacti Designs

Celebrate the seasons with cactus designs that change throughout the year. Paint holiday-themed cacti for Halloween, Christmas, or Spring! Kids can enjoy creating different looks based on the time of year.
This approach fosters creativity and allows children to express their seasonal spirit through art.
– Choose themes relevant to each holiday
– Use colors that reflect the season
– Encourage storytelling through decorations
Step-by-step:
1. Decide on the seasonal theme and colors.
2. Sketch designs based on the chosen season.
3. Paint pots with the festive colors and details.
4. Add embellishments that fit the theme, like glitter for winter.
5. Seal with a final coat for longevity.
Seasonal cactus designs add a fun twist to your decor and keep things interesting year-round!
Seasonal Cacti Designs
Editor’s Choice


13. Cactus with Celestial Themes

Mix the beauty of the cosmos with cactus pottery by adding celestial themes! Paint stars, moons, and galaxies around your cactus designs for a magical touch. This enchanting approach can spark a sense of wonder and creativity.
Using dark blues and purples can create a dreamy effect, while metallic paints can add a cosmic touch.
– Use sponges or brushes for celestial designs
– Incorporate glow-in-the-dark paint for added surprise
– Encourage kids to tell stories about their celestial pots
Step-by-step:
1. Choose a cosmic color palette.
2. Paint a dark base for starry skies.
3. Use sponge techniques for stars and moons.
4. Let dry and add details like glitter or metallics.
5. Seal your design with a glossy finish.
Celestial-themed cactus pots allow for a dreamy, imaginative twist!
14. Collaborative Cactus Mosaic

Encourage teamwork and collaboration by creating a cactus mosaic project! Each child can paint their own piece of pottery to be combined into a larger display. This approach fosters community and creativity, making it a fun group activity.
Bright colors and varied designs will create a stunning collective masterpiece that showcases every child’s uniqueness.
– Assign each child a section of the mosaic
– Encourage creativity in their designs
– Combine pots to form a cohesive display
Step-by-step:
1. Gather a selection of pots for the mosaic.
2. Assign each child a unique design or color scheme.
3. Paint and decorate pots individually.
4. Once dry, arrange them creatively together.
5. Display the final mosaic in a communal space.
Collaborative projects strengthen bonds while creating beautiful art!
Fun fact: collaborative cactus mosaic projects turn solo painters into a team, boosting creativity by up to 40%. When kids see their individual cactus pieces form one vibrant display, they celebrate their shared achievement in cactus pottery painting.
15. Cactus Pottery as Gifts

Cactus pottery makes for thoughtful and heartfelt gifts! Encourage kids to craft personalized cactus pots for family and friends. Adding a special message or design transforms these gifts into one-of-a-kind treasures that convey love and care. This activity nurtures the joy of giving, teaching children the value of handmade gifts. Consider these tips for creating cactus pottery gifts:
– Choose colors and designs that reflect the recipient’s personality
– Include a personal note or message painted on the pot
– Encourage creativity in their design choices
Personalized cactus pottery gifts create cherished memories and meaningful connections that last a lifetime. The thoughtfulness behind each piece adds an emotional touch to any occasion.
Cactus pottery gifts turn simple clay into heartfelt treasures. When kids add a personal note, the gift feels unique and thoughtful. DIY cactus pottery painting teaches generosity and keeps memories blooming long after the last glaze dries.
Conclusion

Embracing cactus pottery painting opens up a world of creativity and play for both kids and adults alike. These 15 playful styles not only encourage artistic expression but also create meaningful decor and gifts that bring a smile to everyone’s face.
Let the vibrant colors and whimsical designs transform your space, inspiring joy and creativity in every corner of your home! Keep exploring and enjoy every joyful brushstroke.
Note: We aim to provide accurate product links, but some may occasionally expire or become unavailable. If this happens, please search directly on Amazon for the product or a suitable alternative.
This post contains Amazon affiliate links, meaning we may earn a small commission if you purchase through our links, at no extra cost to you.
Frequently Asked Questions
Question: What is cactus pottery painting and how can it transform a kids’ room?
Cactus pottery painting is the playful art of decorating ceramic pieces with cactus-inspired motifs using kid-safe paints, markers, and sealants. It’s perfect for kids’ rooms because it blends whimsical design with easy, approachable techniques.
Start with simple shapes like a single cactus silhouette on a small pot, use stencils or freehand drawing, and pick bright, cheerful colors to create colorful pottery designs that double as cactus home decor. Finish with a non-toxic sealant to protect the art for years of playful home accessories display.
Question: What are beginner-friendly cactus pottery painting ideas I can try this weekend?
Great question! Start with easy motifs like a single cactus on a pot, or a tiny cactus family with simple shapes. Use stencils or freehand outlines and keep a limited palette of greens plus a pop of color for the pot.
These ideas are perfect for DIY cactus art projects in kids’ rooms and can quickly become part of a larger cactus home decor collection. Finish with a clear sealant to keep colors bright for years of playful home accessories.
Question: What supplies do I need for cactus pottery painting, and are there kid-safe options?
You’ll want a simple setup: ceramic pots or mugs, air-dry clay or ready-made pottery pieces, kid-safe acrylic paints or markers, fine and wide brushes, a pencil for sketching, and a non-toxic sealant.
Optional extras include stencils, masking tape for clean edges, and a small sponge for texture. Choose non-toxic, washable supplies to keep things fun and safe for kids’ rooms while you create cactus pottery painting magic.
Question: How can I style cactus pottery paintings into cute cactus home decor and playful home accessories?
Group your finished pieces on a shelf or window ledge to create a whimsical vignette. Mix sizes, pair with other cactus-inspired items like plushies or prints, and pick a cohesive palette (greens, yellows, pinks) for colorful pottery designs. These pieces become natural playful home accessories that brighten kids’ rooms and add a touch of cactus home decor.
Question: How should I seal and care for cactus pottery art to keep colors bright?
Let your painting dry completely, then apply a non-toxic sealant designed for ceramics to lock in color and guard against fingerprints. If you’re not firing pottery, use a clear acrylic sealant and reapply every 6–12 months as needed. Clean gently with a damp cloth and avoid harsh scrubbing; keep pieces out of direct sun to prevent fading and enjoy long-lasting cactus pottery painting results.
Related Topics
cactus pottery painting
whimsical decor
colorful pottery designs
DIY cactus art
pottery painting techniques
kids' room decor
playful home accessories
beginner friendly
easy DIY projects
seasonal crafts
home decor trends
creative kids activities